چک کردن مقدار TextInput در react native


سلام دوستان . در این آموزش متنی قصد داریم یاد بگیریم که چجوری مقدار ورودی توسط کاربر در ReactNative رو چک کنیم.گاهی اوقات کاربر بعضی از فیلدها رو خالی میگذارد و یا اشتباهی بر روی دکمه ثبت اطلاعات کلیک میکند.اگر مقداری درون TextInput قرار نداشته باشد ما یک blank value رو در دیتابیس ذخیره میکنیم که امری کاملا اشتباه است.بنابراین با استفاده از این آموزش ما میتونیم بررسی کنیم که آیا یک مقدار در TextInput وجود دارد یا نه.
1.ساخت یک پروژه جدید.اگه نمیدونید چطور اینکارو بکنید،پیشنهاد میکنم دوره آموزش مقدماتی react native رو ببینید(برای مک هم میتونید مقاله آموزش نصب react native بر روی مک رو مطالعه کنید)
2.اضافه کردن کامپوننت های AppRegistry, StyleSheet, TextInput, View, Alert and Button در بلاک import
|
1 |
import { AppRegistry, StyleSheet, TextInput, View, Alert, Button } from 'react-native'; |
3.ایجاد constructor در کلاس اصلی با پارامتر props شامل متد super
|
1 2 3 4 5 6 |
constructor(props) { super(props) } |
4.اضافه کردن this.state در constructor و ایجاد 3 متغیر به نام های TextInputName, TextInputEmail و TextInputPhoneNumbe
|
1 2 3 4 5 6 7 8 9 10 11 12 13 |
constructor(props) { super(props) this.state = { TextInputName: '', TextInputEmail: '', TextInputPhoneNumber: '' } } |
5.ایجاد یک تابع به نام ()CheckTextInputIsEmptyOrNot . در این تابع ما ابتدا مقادیر همه ی Text Input رو بررسی میکنیم و درصورت خالی بودن یک پیغام به کاریر میدهیم.
|
1 2 3 4 5 6 7 8 9 10 11 12 13 14 15 16 17 |
CheckTextInputIsEmptyOrNot = () =>{ const { TextInputName } = this.state ; const { TextInputEmail } = this.state ; const { TextInputPhoneNumber } = this.state ; if(TextInputName == '' || TextInputEmail == '' || TextInputPhoneNumber == '') { Alert.alert("Please Enter All the Values."); } else{ // Do something here which you want to if all the Text Input is filled. Alert.alert("All Text Input is Filled."); } |
6.ایجاد StyleSheet در بالای خط کد AppRegistry.registerComponent
|
1 2 3 4 5 6 7 8 9 10 11 12 13 14 15 16 17 18 19 20 21 |
const styles = StyleSheet.create({ MainContainer :{ justifyContent: 'center', flex:1, margin: 10 }, TextInputStyleClass: { textAlign: 'center', marginBottom: 7, height: 40, borderWidth: 1, // Set border Hex Color Code Here. borderColor: '#FF5722', } }); |
7.اضافه کردن View درون بلاک render return با استایل MainContainer
|
1 2 3 4 5 6 7 8 9 10 11 |
render() { return ( <View style={styles.MainContainer}> </View> ); } |
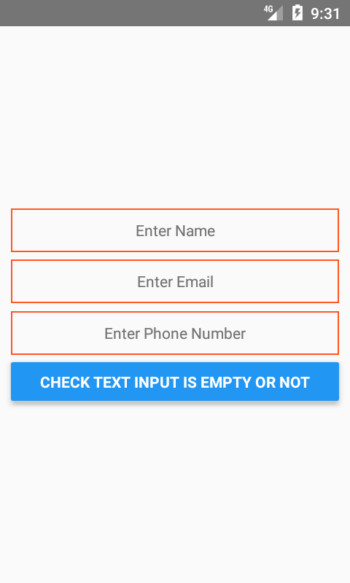
8.اضافه کردن 3 TextInput و Button درون View
placeholder: نمایش متن راهنما درون TextInput
onChangeText : هر زمانی که کاربر چیزی را تایپ میکند،مقدار آن در state ذخیره میشود.
underlineColorAndroid: مخفی کردن خط پایه Text Input
onPress: فراخوانی تابع ()CheckTextInputIsEmptyOrNot در رویداد onPress دکمه.
|
1 2 3 4 5 6 7 8 9 10 11 12 13 14 15 16 17 18 19 20 21 22 23 24 25 26 27 28 29 30 31 32 33 34 35 36 37 38 39 40 41 42 43 44 45 46 47 48 49 50 51 52 53 |
render() { return ( <View style={styles.MainContainer}> <TextInput // Adding hint in Text Input using Place holder. placeholder="Enter Name" onChangeText={TextInputName => this.setState({TextInputName})} // Making the Under line Transparent. underlineColorAndroid='transparent' style={styles.TextInputStyleClass} /> <TextInput // Adding hint in Text Input using Place holder. placeholder="Enter Email" onChangeText={TextInputEmail => this.setState({TextInputEmail})} // Making the Under line Transparent. underlineColorAndroid='transparent' style={styles.TextInputStyleClass} /> <TextInput // Adding hint in Text Input using Place holder. placeholder="Enter Phone Number" onChangeText={TextInputPhoneNumber => this.setState({TextInputPhoneNumber})} // Making the Under line Transparent. underlineColorAndroid='transparent' style={styles.TextInputStyleClass} /> <Button title="Check Text Input Is Empty or Not" onPress={this.CheckTextInputIsEmptyOrNot} color="#2196F3" /> </View> ); } } |
9.کد کامل برنامه در فایل index.js
|
1 2 3 4 5 6 7 8 9 10 11 12 13 14 15 16 17 18 19 20 21 22 23 24 25 26 27 28 29 30 31 32 33 34 35 36 37 38 39 40 41 42 43 44 45 46 47 48 49 50 51 52 53 54 55 56 57 58 59 60 61 62 63 64 65 66 67 68 69 70 71 72 73 74 75 76 77 78 79 80 81 82 83 84 85 86 87 88 89 90 91 92 93 94 95 96 97 98 99 100 101 102 103 104 105 106 107 108 109 110 111 112 113 114 115 116 117 |
import React, { Component } from 'react'; import { AppRegistry, StyleSheet, TextInput, View, Alert, Button } from 'react-native'; class Myproject extends Component { constructor(props) { super(props) this.state = { TextInputName: '', TextInputEmail: '', TextInputPhoneNumber: '' } } CheckTextInputIsEmptyOrNot = () =>{ const { TextInputName } = this.state ; const { TextInputEmail } = this.state ; const { TextInputPhoneNumber } = this.state ; if(TextInputName == '' || TextInputEmail == '' || TextInputPhoneNumber == '') { Alert.alert("Please Enter All the Values."); } else{ // Do something here which you want to if all the Text Input is filled. Alert.alert("All Text Input is Filled."); } } render() { return ( <View style={styles.MainContainer}> <TextInput // Adding hint in Text Input using Place holder. placeholder="Enter Name" onChangeText={TextInputName => this.setState({TextInputName})} // Making the Under line Transparent. underlineColorAndroid='transparent' style={styles.TextInputStyleClass} /> <TextInput // Adding hint in Text Input using Place holder. placeholder="Enter Email" onChangeText={TextInputEmail => this.setState({TextInputEmail})} // Making the Under line Transparent. underlineColorAndroid='transparent' style={styles.TextInputStyleClass} /> <TextInput // Adding hint in Text Input using Place holder. placeholder="Enter Phone Number" onChangeText={TextInputPhoneNumber => this.setState({TextInputPhoneNumber})} // Making the Under line Transparent. underlineColorAndroid='transparent' style={styles.TextInputStyleClass} /> <Button title="Check Text Input Is Empty or Not" onPress={this.CheckTextInputIsEmptyOrNot} color="#2196F3" /> </View> ); } } const styles = StyleSheet.create({ MainContainer :{ justifyContent: 'center', flex:1, margin: 10 }, TextInputStyleClass: { textAlign: 'center', marginBottom: 7, height: 40, borderWidth: 1, // Set border Hex Color Code Here. borderColor: '#FF5722', } }); AppRegistry.registerComponent('Myproject', () => Myproject); |
اسکرین شات:


دیدگاهتان را بنویسید